

A leaking vape is usually caused by overfilling, a worn coil, a poor seal or e-liquid collecting around the airflow. If you’re wondering why your vape is leaking, start by checking the pod or tank for these issues. A little moisture may be condensation rather than a leak.
It’s frustrating to find e-liquid on your hands or in your pocket, especially when the cause isn’t obvious. This guide explains how to fill a pod or tank without overfilling it, spot damage and decide when a coil or pod needs replacing. It also covers what a leak from an older disposable vape may indicate, as single-use vapes have been banned in the UK since June 2025.
Start with the simplest checks, then try the fixes that suit your device. You can also reduce the risk of leaks by storing your vape upright and using e-liquid suited to the coil.
Key Takeaways
- A burnt taste, weaker flavour or leaking can point to a worn coil; learn what to inspect before replacing it.
- Leave a small air gap when filling and stop at the pod or tank’s maximum fill line.
- Check seals, connections and the pod or tank body for damage that could let e-liquid escape.
- Find out what a leak from a single-use vape may indicate, and how UK rules affect these devices.
- If a pod needs replacing, see when IVG Pro 12 Refill Pods may be a suitable next step.
Why is my vape leaking?
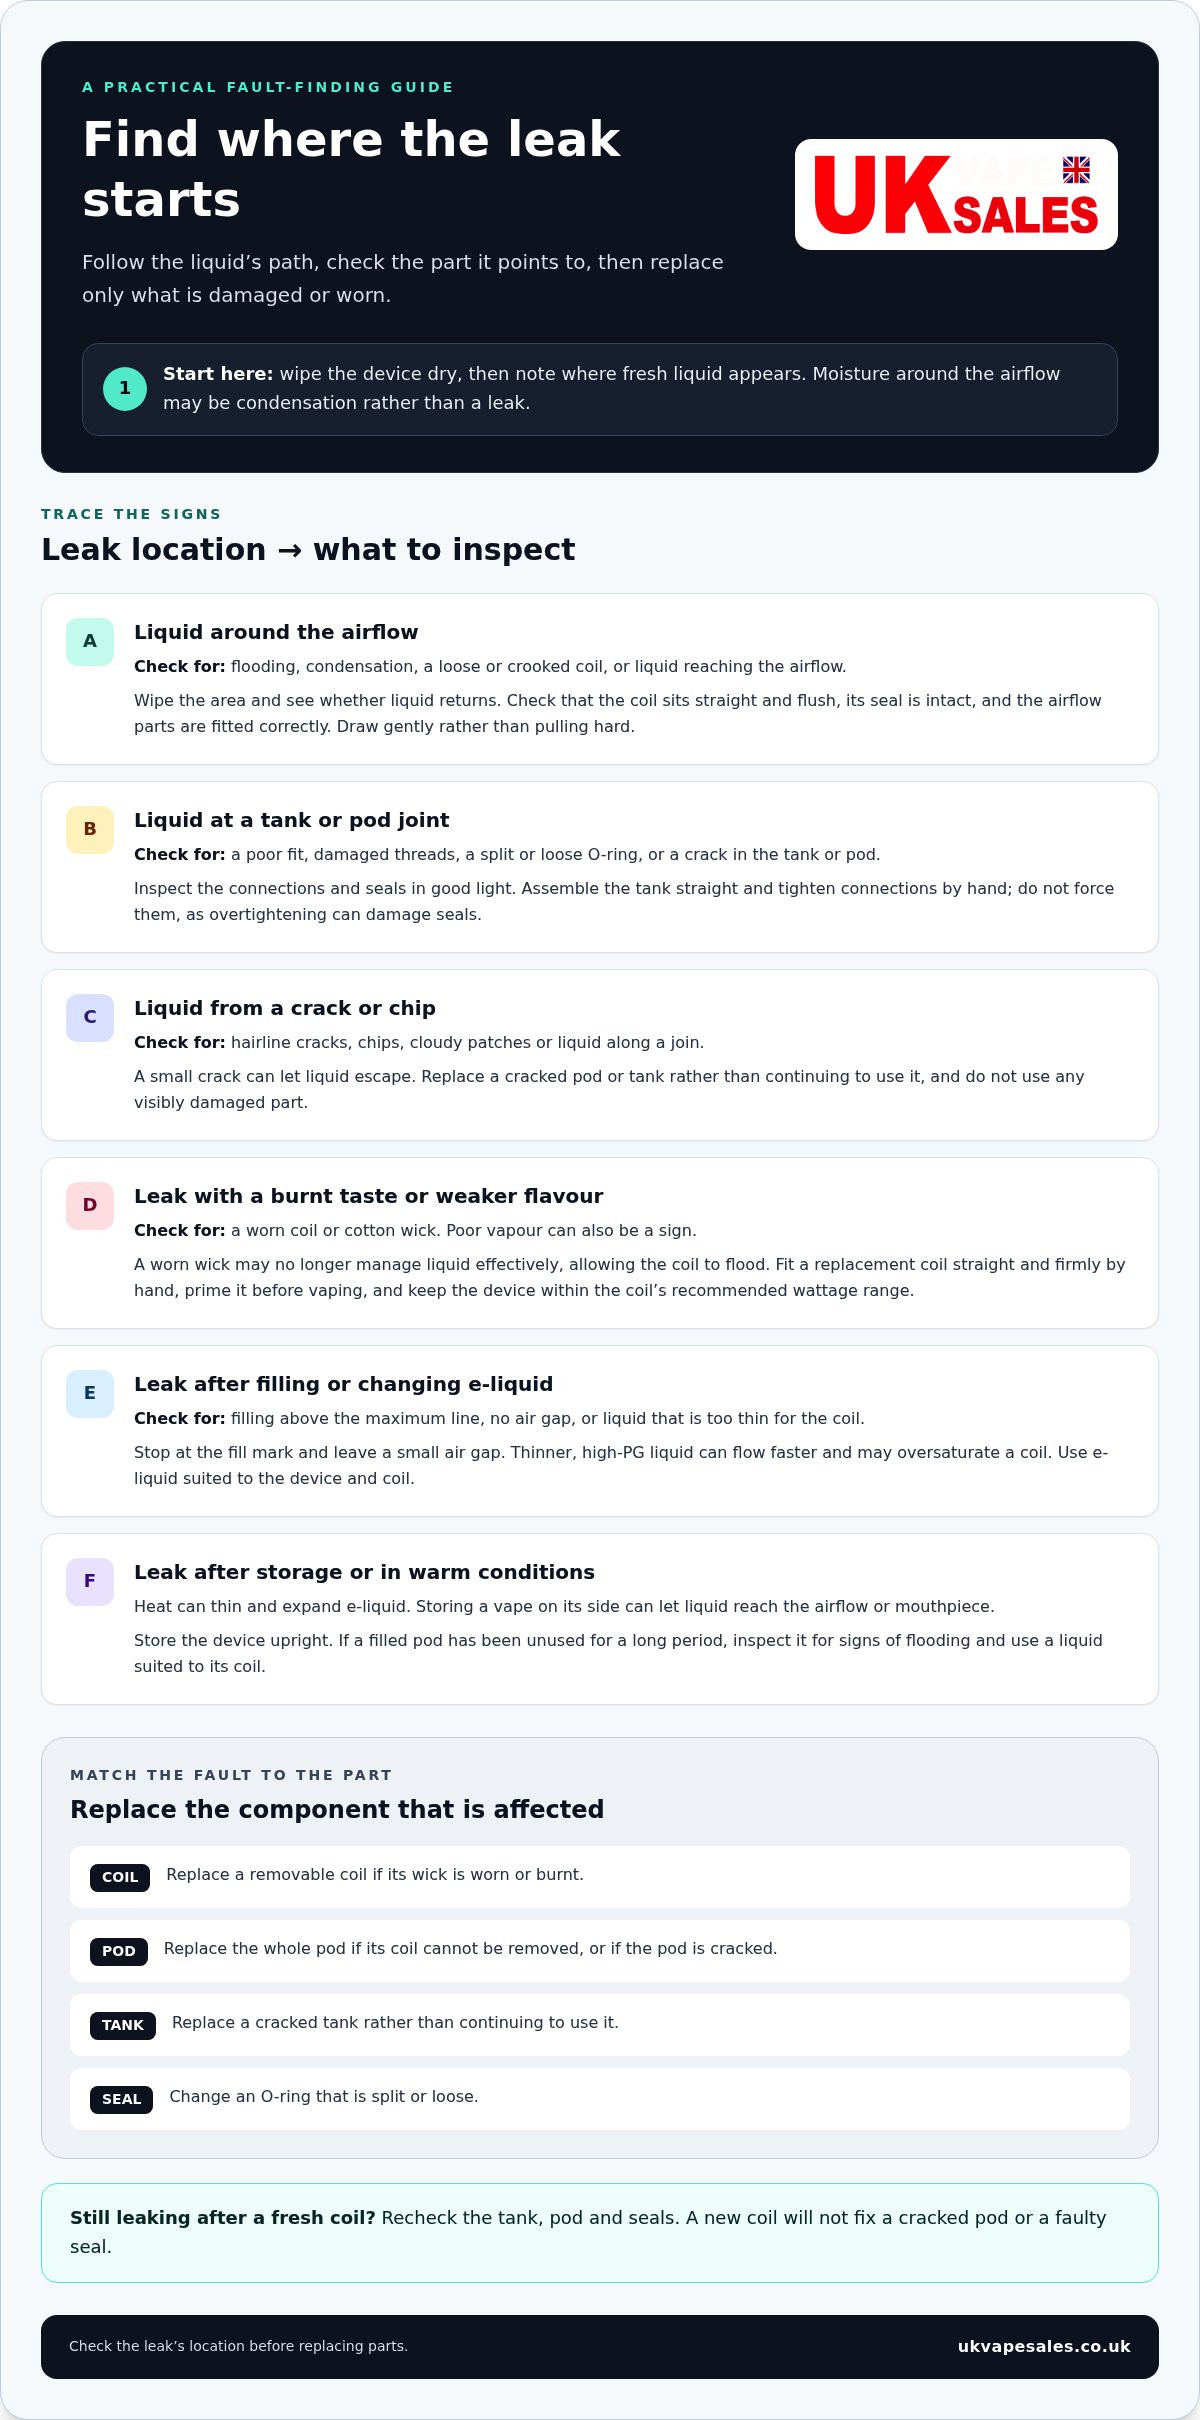
Common causes include a poorly seated or worn coil, overfilling, damaged seals and cracks. Check where the liquid appears before replacing parts: condensation around the airflow can look like a leak.
- Wipe the device, then note where fresh liquid reappears. Liquid around the airflow may point to flooding or condensation, while liquid at a tank joint suggests a seal or fitting problem. Heat can thin and expand e-liquid, and storing a vape on its side can let liquid reach the airflow or mouthpiece. Don’t assume altitude is the cause without other signs.
-
Check the coil and airflow
Check that the coil sits straight and flush and that its seal is intact. A loose or crooked coil can leave a gap for liquid to escape; damaged threads can also prevent a secure fit. Draw gently rather than pulling hard, and make sure airflow parts are fitted correctly. If liquid gathers near the airflow, wipe it away and check whether it returns before blaming the coil.
-
Inspect the tank, pod and seals
In good light, examine the tank or pod for cracks, chips and loose connections. Even a small crack can let liquid escape. Check rubber O-rings for splits, looseness or wear, and make sure the tank is assembled straight. Tighten connections by hand, but don’t force them, as overtightening can damage seals. Replace a cracked pod or tank rather than continuing to use it.
-
Replace a worn or burnt coil
A burnt taste, weaker flavour, poor vapour or liquid leaking from the pod can indicate a worn coil or cotton wick. As the wick degrades, it may stop managing liquid effectively and allow the coil to flood. Fit a replacement coil straight and firmly by hand, without overtightening. Prime a new coil before vaping and keep the device within the coil’s recommended wattage range.
-
Decide which leaking part to replace
Match the replacement to the fault: change a removable coil if its wick is worn or burnt, or replace the whole pod if the coil cannot be removed. Replace a cracked tank or pod, and change an O-ring that is split or loose. If the device still leaks after fitting a fresh coil, inspect the tank, pod and seals again. Don’t use a visibly damaged part.
- If the pod or tank looks intact, consider whether the leak began after you changed e-liquid or left a filled pod unused overnight. E-liquid that is too thin can oversaturate the coil, as can leaving a filled pod unused overnight or longer. Use a liquid suited to the coil and avoid leaving a filled pod unused for long periods.
Overfilling pods and leaving an air gap
Yes. Filling a pod or tank above its maximum line can push liquid into the coil and through seals. E-liquid that doesn’t suit the coil may also contribute to flooding and leaks. Leave a small air gap and match the liquid to the device.
- Find the maximum fill line before adding liquid. The fill mark may be somewhere on the pod, tank or coil. Stop at the mark rather than filling to the brim. Extra liquid can enter the coil and escape through airflow openings or imperfect seals. If your refillable pod has no obvious mark, check its design and avoid filling to the top.
- Keep a small air gap at the top of the reservoir. This gives the liquid room and helps it stay inside when you close the fill port. For a tank, tilt it at a 45-degree angle while filling, keeping the opening clear of liquid. Add liquid slowly, then return the tank upright before sealing it.
- Control the bottle as you fill. Squeeze gently, as a forceful stream can overfill a small pod before you notice. If your device allows it, close the airflow first; liquid pushed towards open airflow can leak from the vents. Secure the fill port, wipe away spills, then check whether fresh liquid appears around the base.
- Match e-liquid thickness to the coil rather than changing liquid at random. Thinner, high-PG liquid can flow faster and may oversaturate a coil. Low-powered pod kits and high-ohm coils are generally suited to 50/50 e-liquid. Use 70/30 shortfills only in devices and pods designed for sub-ohm, higher-wattage vaping. The 70/30 shortfill e-liquids category is relevant when your device is designed for that style of vaping.
- After filling, keep the pod upright and let the liquid settle around the coil before vaping. Don’t squeeze the bottle to top up a nearly full reservoir. If leakage starts after switching to a thinner liquid, empty and clean the pod, then use a liquid suited to its coil. A thicker liquid won’t fix a cracked pod or faulty seal, so inspect those parts separately.
Treat the fill mark as a limit: fill a tank only to its maximum line, and don’t overfill it. Locate the mark before adding liquid; it may be on the coil or the outside of the pod or tank. Leave a slight air gap instead of filling to the top. This makes it easier to control the fill level without guessing how much the reservoir can hold.
While filling, close the airflow if the tank or pod allows it. Apply gentle pressure to the e-liquid bottle and avoid squeezing it too hard. A controlled approach brings together the key precautions: observe the maximum line, leave a little room above the liquid, and avoid forcing liquid into the reservoir. Once the liquid reaches the appropriate level, stop adding more and complete the fill without pressing the bottle harder. Keeping these steps in mind can help make each refill consistent and avoid filling beyond the device’s indicated limit.
Checking pods and tanks for damage
A crack, loose connection or worn seal can give e-liquid a route out. Inspect the refillable pod or tank before changing settings or replacing other parts.
-
Clean and inspect the pod or tank
Remove the pod or tank from the device, empty it and inspect its body under good light. Look for hairline cracks, chips, cloudy patches or liquid along a join. Rinse the removable tank or pod with warm water, then use a cotton bud to clear excess liquid from the mouthpiece and chimney. Let the parts dry fully before refilling or reconnecting them.
-
Check the seals and O-rings
Examine each rubber O-ring and seal around the tank, including those near the base and connection points. A ring that looks cracked, stretched or loose may no longer hold liquid in place. Replace a visibly damaged seal rather than trying to compensate by tightening the tank. Hand-tighten the connections until secure, but don’t force them.
- After cleaning, check where the leak forms. Liquid at a tank joint points to a connection or seal; moisture emerging through a crack suggests damage to the pod or tank body. Wipe the area dry, refill carefully and see which spot gets wet first. This helps distinguish a faulty seal from excess liquid around the mouthpiece.
- Check the threading before reassembling a tank. Damaged or cross-threaded connections can stop the parts sitting straight, leaving a gap for liquid to escape. Turn the parts gently by hand and make sure they meet flush. If they catch, wobble or won’t align, don’t force them tighter; inspect the threads and replace the damaged component.
- Clean the pod or tank and mouthpiece when you change the coil. Residual liquid can collect in the chimney and look like a new leak, even when the seals are intact. Use a cotton bud to remove excess, then check the surrounding surfaces for fresh wetness. Regular checks also make it easier to spot a small split before it causes more leakage.
- Consider recent knocks as well as visible cracks. A fall onto a hard surface can damage a refillable pod or loosen a tank connection, causing liquid to seep from the affected area. Check the device after a fall, and don’t continue using a pod or tank with a chipped edge, broken join or persistent leak.
- Replace the failed part rather than repeatedly tightening or cleaning it. Swap a cracked pod or tank, and replace an O-ring that is split or loose. If the body and seals look sound, inspect the coil and its fit instead. Cleaning removes residue, but it can’t repair physical damage or restore a worn seal.
Disposable vape leaks
Single-use vapes have been banned in the UK since June 2025. This section therefore treats leaks from them as historical examples, not advice for using or repairing one today.
- Historical reports described e-liquid leaking through a damaged outer shell. A crack or crushed casing could compromise the device and let liquid seep out. This helps explain why a visible leak on an older single-use vape was not necessarily a coil problem.
- Storage conditions were another reported factor. Heat can thin and expand e-liquid, while leaving a device on its side can let liquid reach the airflow or mouthpiece. These observations help explain past leak reports; they are not advice to keep using a leaking single-use device.
- Older reports also described leaks after devices were left in hot cars or prolonged direct sunlight. Temperature changes can affect the liquid inside, while a compromised casing may provide an escape route. The circumstances of a historic leak can help distinguish heat exposure from impact damage.
- Not every damp airflow opening means the casing has failed. Condensation from cooled vapour can collect near airflow holes and be mistaken for leaked e-liquid. In historical accounts, the location and persistence of moisture helped distinguish condensation from liquid escaping through a damaged shell.
- Past reports also mentioned vaping behaviour as a possible contributor. Aggressive inhaling could draw excess liquid towards the airflow, making moisture appear around the opening. This doesn’t establish the cause of any particular leak; casing condition, storage and timing all matter when interpreting an older incident.
- A leak from an older single-use vape doesn’t, by itself, determine whether a retailer’s returns policy applies. The purchase circumstances, reported fault and seller’s policy are relevant. Keep any available purchase record and describe what happened clearly when discussing a historic transaction with the retailer.
- These examples help explain past reports, but the UK ban means single-use vapes are no longer a current option. Don’t treat them as devices to refill, repair or keep using. For a present-day leak, follow the guidance for the reusable pod or tank involved rather than applying advice about older single-use devices.
UK Vape Sales: IVG Pro 12 Refill Pods
UK Vape Sales offers IVG Pro 12 Refill Pods as a replacement option if your compatible pod is cracked, worn or continues leaking after cleaning. First check that your device uses the IVG Pro 12 system: a replacement pod won’t fit every vape, and it won’t fix a damaged device connection or another fault.
If the pod itself is the problem, you can view the IVG Pro 12 Refill Pods. Choose a replacement only when it matches your device, and stop using any pod with visible damage or persistent leakage.
For a compatible replacement, visit ukvapesales.co.uk.
Get your next device setup right
If you’re still wondering why your vape is leaking, use the pattern of the leak to guide your next step. A fault that returns after cleaning may mean a part needs replacing, not another adjustment. Before choosing a refill pod, check that it matches your device; a different system won’t fix a compatibility problem.
UK Vape Sales offers various replacement refill pods and compatible device kits to suit your vaping preferences. These options suit people looking for a reliable replacement, but remember that parts won’t fit every brand or model. Always check your device name before choosing, and don’t use a component that continues to leak or shows visible damage.
For help finding the relevant option, contact UK Vape Sales. With the right compatible part, you can take a practical next step and get back to using your device with confidence.
Frequently Asked Questions
How do I stop my vape from spitting?
Spitting happens when small droplets of warm e-liquid travel up the chimney and reach your mouth with the vapour. If your device has a fire button, release it just before finishing your inhale. On a vape with adjustable airflow, opening it may also help. These steps can reduce spitting, but persistent droplets may mean liquid is collecting in the chimney.
Why is my vape bubbling?
Bubbling or crackling can happen as e-liquid heats and bubbles pop during a draw. Try taking a deeper inhale, which may reduce the bubbling. A brief sound as the liquid warms is different from persistent gurgling with every puff. If the sound continues or liquid reaches your mouth, pause vaping and check the device before drawing again.
Is it safe to use a vape that is leaking, and what should I do if e-liquid gets on my skin or in my mouth?
Don’t use a visibly damaged pod or tank. Wipe the device, find where fresh liquid appears, and replace the cracked part, worn seal or faulty coil. The guidance does not provide steps for e-liquid getting on your skin or in your mouth.